Music Theory – Level 1 – The Articles

•December 10, 2010 • Leave a Comment

Article Header Graphic - Scales in Music

Scales in Music – A Tonal System

Music Theory – Level 1 – The Articles

Series Introduction

From: Music Theory and Composition

Below is a list of the articles in the Music Theory Section and each is in the first level of that section. Also, each article is labeled along with a brief explanation of it’s content. Note: Most of these articles are multimedia presentations.

Table of Contents

Music Theory – Series Introduction – Part 10An overview and introduction to the article series titled Music Theory Section, Level 1.

Note Identification – Music Theory – Part 11 – Is an extension of the article, The Musical Note, which was presented in the article series Acoustics of Music. In this article, we will explore further the musical note, naming them, modifying them with a name change through the use of accidentals and modifying them without a name change but modifying them through symbols that change the frequency level or octave the performer is directed to play them in. Note Identification, Part 11 is a multimedia presentation with charts and mp3 examples.

The Musical Rest –  Silence in Music –  Music Theory – Part 12 – Explains the use of silence in music and presents the symbols for rests. The article goes further with explanations about each symbol and it explains the specific instruction to a performer to not play or to silence his or her musical instrument. The Musical Rest, Silence in Music, Part 12 is a multimedia presentation with charts and mp3 examples.

Dotted Notes and Rests – Music Theory – Part 13 – Demonstrates the dotted note and rest through a multimedia presentation. This article also includes some of the basic mathematics of music. Charts and mp3 sound clips are used to assist in the explanations.

Bar Lines – Music Theory – Part 14 – Demonstrates the various basic bar lines as used in music notation and provides an in depth look at their usage. It is a brief explanation with some new information about barlines. It follows in the footpath of two articles independent articles titled, Music’s Secret Stairway, The Grand StaffPart 1 and Part 2.

Mini Series – Repeats

Repeats – Music Theory – Level 1 is a mini-series on the subject of repeats as used in music notation. It demonstrates the various repeat symbols and introduces new words and symbols and their respective meaning. This is a miniseries of four articles and all are multimedia presentations using charts and mp3 samples. The Repeats mini-series includes the following articles;

Repeats – Music Theory – Part 15a – This article is an introduction to repeats. We explore the basic uses of the repeat symbol. Learning how the Composer writes the symbols and what they mean. This is a multimedia presentation.

Repeats – Endings – Music Theory – Part 15b – 1st and 2nd Endings extends the study of the symbols used to cause a replay of a section of music. These tools are useful in to extend a section of music or multiple sections of music through the use of this type of repeat symbol.

Repeat Words – Music Theory – Part 15c –  Repeat Words delves into some Latin words and phrases that cause a replay of entire sections and skipping around inside the sections of a composition.

Repeats – Notes and Rests – Music Theory – Part 15d – Repeating Notes, Rests and Measures is the main topic within this article. We explore how to repeat notes and rests using a single symbol as well as repeating entire measures of music.

Brackets and Braces – Music Theory – Part 16 – Demonstrates some of the important brackets and braces used in music notation. Chart presentations are included along with explanations of their meaning for both brackets and braces.

Balance of the Articles in the Series

The Fermata – Music Theory – Part 17 – The fermata is another tool available for the composer and performers of music which enables extending the note and rest values by a symbol placed above or below specific notes or rests.

Ties and Slurs – Music Theory – Part 18 – Demonstrates the differences between them and discusses the usage of ties in slurs. demonstrating their uses in various ways opens up more options to a composer when creating new music.

Series Conclusion – Music Theory – Part 19 – Is the conclusion of Music Theory Level 1 article series and provides a review of the material presented throughout the article series.

I hope you will enjoy the Music Theory Level 1 article series.

Stop in today to learn more!

StringTunes – Music To Soothe Your Soul!

Music Theory and Composition

Acoustics of Music – 9-Part Article Series

•August 7, 2010 • Leave a Comment

Main Article Photo - Scales

Scales in Music – A Tonal System

Acoustics of Music – 9-Part Article Series

Series Introduction

Welcome to the series introduction for Acoustics of Music. It is my hope that those of you who reach to this series can invest enough of your time to review the entire collection of articles presented here. I sincerely hope that you find value and that you find this series an excellent resource to further build upon your existing knowledge or to begin establishing a solid basis for understanding the acoustical characteristics of sound. I would appreciate your efforts to suggest or to encourage others who you feel would gain from this presentation to stop in for a visit. Thank you for your time!

Opening Comments – I remember when I first introduced the scales in music and when I began to compose music. The scales were originally introduced to me by my grade school teacher while learning to play the flute-o-phone. I had learned a lot about notes and how to play them but what was missing was an understanding of what made it possible to not only understand the basics of performing music but for initiating my interest in the creation of music as well. I wanted to know the acoustics of music and the underlying principals of it.

Further, and more important to me was the answer to this question; what are the underlying principals and tools needed to create this thing called music, from a composer’s perspective, especially one who has delved into the digital world of music production?

My attempts to answer that question have led me to understand more about the structures and characteristics of sound as well as the use of musical scales. My continued efforts to learn everything I could about scales and music composition resulted in what I am now referring to as a Tonal System – Scales in Music. That is, a closed system of the structures used in music for formulating new compositions, understanding existing music in more detail and deepening my appreciation for music. Even though the system itself is a closed system, it offers an unlimited sonic arena in which to play and to create music.

For anyone interested in learning that information, you will find this article series useful. These fundamentals are and remain the relevant foundation for enhancing your appreciation of music, for maximizing your abilities for engineering sound and for creating music.

Prerequisite Study

In recent articles posted on my official blog, I have presented information about various fundamental aspects of music including information about the basic characteristics of sound, tempo, the grand staff, notes and note values, etc. You will find them useful as adjunct studies or prerequisite studies for this new series about acoustics. I believe they can serve as a well rounded introduction to music and/or to provide a decent review for others who have a stronger background in music and composition or for those who simply wish to brush up on relevant information.

Certainly, in the least, this collection of articles can help you to broaden your understanding of the fundamentals of sound and of music, to come to know many of the tools a composer uses in his or her craft and to extend your overall appreciation of music in a general sense.

Lastly, it is possible that through these articles you can be so creatively aroused as to awaken in you that unique desire to compose your own music. On that basis, it would thrill me to know that I was instrumental in causing that to happen.

Overview

The title of this article series is Scales in Music – A Tonal System – Acoustics of Music. This set of articles is the first part of a collection of articles to be written about the structures and concepts used in music and music composition. Therefore, it is a chapter in essence of a much larger collection of articles related to music.

Acoustics of Music Series – With that said, this nine part article series Acoustics of Music takes a different and slightly more advanced approach than my original article titled Characteristics of Sound. It will broaden your understanding of the key and relevant knowledge that is vital and useful as you advance your current knowledge of music, begin a new study of music and/or to pursue and further your interests in composing more and hopefully better music.

What I hope to convey to you is an understanding of how a collection of tones or notes, when grouped together, within specific limitations, make up a useful and musical tonal system that enables composition and the performance of music. In order to do that, we must first begin by looking at the biological mechanism, the human ear, which receives external sound and causes our brain to understand the differences in the characteristics of that sound.

We will then proceed with reviewing the main principals within the field of acoustics that play an important role in music and music making. These presentations will demonstrate the underlying concepts of the characteristics of sound. This series is a more scientific approach to deepen your understanding about them. They are also the fundamental concepts necessary to know when working with sound as a business owner or an employee in such areas as mastering music, restoring sound tracks, engineering samples, manipulating recorded sound, mixing and mastering music and other work related to sound.

The complete study of sound, specifically as an in depth study of the science of acoustics, goes way beyond the intended scope of this article series however we believe it is necessary to provide some of the fundamental and essential information relative to the study of music and music production, all of which are parts of this articles series. The more you advance along your musical journey the more you will want to learn more about them. So, based upon your interests, if you haven’t already, I would urge that you consider the study of acoustics.

Whenever possible and appropriate we will provide throughout this series of articles, photos, sound clips and short videos demonstrating the concepts being discussed. We feel this multimedia approach will help to solidify your understanding of the concepts being presented.

Lastly, throughout the articles are links to external and additional resources for you to continue researching any concepts and principals in music you are interested in looking further into. In most cases they will be to educational resources rather than simply blog post made by others. Whenever possible, these links will include; lectures at colleges and universities, videos presenting the concepts further and other links of value.

Acoustics of Music Series – Article Links

All of the articles included in the series Acoustics of Music are now posted and complete with the exception of the Glossary of Musical Terms as that post is linked to the entire series Scales in Music – A Tonal System and will be periodical revised. Hopefully this introduction page will help you more easily navigate to the specific article you wish to study or review. Also, I have added a new category which was set up to make it easier to find the series no matter what page you are on in this website. It is in the right sidebar called Categories.

Please feel free to come back when you are in the neighborhood to review the content of the whole series.

Series Introduction – Part 1 – This is the part you are reading now. Please continue your perusal of this excellent article series by proceeding to Part 2 below.

Audible Range of Human Hearing – Part 2 – is a basis point, human hearing. Without the ability to hear sound creating music and enjoying music must be done through another modality than through hearing. We will explore the two main limiting factors that become our strengths in music composition and in our enjoyment of music.

Acoustic Principals – Frequencies – Part 3 – begins with a closer look into one of the main principals of acoustics, frequency. This principal provides a strong foundation for understanding sound and it establishes a means for the discovery of how musical scales are created.

Chart of Frequencies – Part 4 – is an extension of Part 3. It includes a really cool chart showing all of the frequencies in each of eight octaves of sound. Within this article you will also discover the commonalities and the differences between the frequencies or notes used in music.

Fast Fourier Transform – Part 5 – For those not knowledgeable about this interesting technological tool, this introduction certainly will allow you to not only become familiar with it in a basic sense but it will help you to understand how sound engineers actually work with sound frequencies and their waveforms to “tweak” the characteristics of sound. The article demonstrates a unique comparison of frequencies.

Acoustic Principals – Amplitude – Part 6 – describes the principal of amplitude or the principal of loudness as related to sound and presents another very cool tool that assists in engineering sound.

Acoustic Principals – Overtones – Part 7 – adds more information about the overtones within the sound spectrum beyond that included in the article Characteristics of Sound. You will also discover the harmonic relationships of the sounds produced on a guitar string as well as the basic methods of producing sound on various musical instruments.

Conclusion – Part 8 – concludes this series which focuses on acoustics of music. Includes a brief summary and additional comments.

Glossary – Part 9 – defines some of the important words used within this series to help in your understanding of the language of music and music making.

The nine parts of the article series Acoustics of Music will help to set into place a solid foundation based upon principals of acoustics setting the foundation for us to proceed to discover scales in music and it puts us on the pathway for discovering the complete tonal system. They are collectively the first “section” if you will, for understanding scales in music and the bigger tonal system in music which is the main purpose of this series of articles as a whole.

Future Plans

Moving forward from a basic study of the acoustics of music I am planning to post, over time, 9 additional “sections” to enhance your overall knowledge of music and music composition. I’ll speak more about that in a minute.

The next section is currently underway and it is called simply Music Theory. It is a multimedia series of articles reviewing the many aspects of music theory including; notes, rests, dotted notes and rests, staff lines, repeats, enharmonic notes, scales in music, the circle of fifths, intervals, chords, etc.

What makes this series on music theory different than most you currently find on the internet today is that each tool in the composer’s toolbox is discussed in depth with charts, mp3 clips and related videos to bring home significant points. In essence, it is a multimedia on-line music theory course which is part of the overall series titled Scales in Music – A Tonal System.

Scales in Music – A tonal System is a book I’ve been trying to write for a long time. It is about music and the concepts within the field of music and music composition that are designed from a composer’s perspective. It is also a living project in so far as it is not finished and in fact I am writing it even now.

Regularly I post each new “part” on my official blog. I plan on updating this post with a link to each new article as it is posted. I will include a brief summary as well. The entire project will be available at my Official Blog. Please feel free to stop in any time. I look forward to your participation, comments, suggestions and mostly the friendship.

Don

Please proceed with Part 2 titled – The Audible Range of Human Hearing.

Building a New Home Studio – Results

•December 1, 2009 • Leave a Comment

It started out as a thought several years ago. It was only a dream that finally moved into the real world, accomplished only through direct action. I never thought that I would do construction or a major remodeling job on my own.  After all, I thought I didn’t have the skill to actually do it. Never in all of my years of living has it been something I wanted or would have chosen to do for a living. I took years to move my dream of a home studio from merely a thought to full manifestation in real life.  I didn’t think I would have ever begun such an undertaking that I could actually accomplish, otherwise, I would have been eager to begin long ago. I didn’t think I had enough money or talent to pull it off. There were many reasons not to try.

I am not really sure where the energy for completing this project came from  other than the fact that for years I wanted to have a “place” to make music that would make me feel comfortable and inspired by my environment, specifically a music creation DAW, digital audio workstation, where I could continue my work as a Composer. My friend Jeff from New York was the instigator, so to speak. His visit and support to put in some electrical outlets in the basement area, where I was writing music, left me with a desire to attempt to put together the final plans. In doing this I found I had supercharged and employed my emotions enough towards doing this project that taking action was the only solution. At that point I began to take the action necessary to build this new “space” for me to compose in. I at least had to try.

When finalizing the plans for my new studio, I felt that the general floorplan and layout required a space for enabling computer work, a space for composing and practicing/playing the classical guitar and a space for my books and other resources I had been using with regards to playing music and for my music composition efforts. I also wanted to have a place where I could read and study more about the classical guitar and its music, classical music in general, the software needed to produce the music and to further my ongoing study of music composition. It turns out that my new studio does all of that for which I am very satisfied with the completion of this project. There are a few things that remain to be finished and they will be once the funding becomes available. For now, my new studio is a far cry from cement walls and pipes and the normal things one sees in an unfinished basement area.

I did not write this blog post series to slap myself on the back in a weak attempt at self praise. I wrote it to hopefully inspire others to begin their own effort to build something they had longed for but just couldn’t get out of the gate. I wrote it to demonstrate some of the things a person would run into while doing a project such as this and to hopefully help others in some small way, making their pathway easier than mine was. It is my hope that this series of posts accomplishes that.

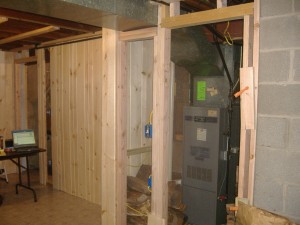
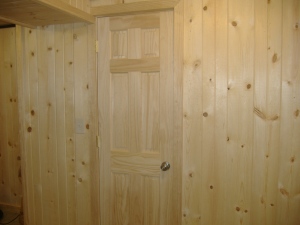
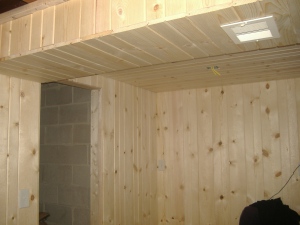
Now, here we are after nine long weeks mostly nights and weekends of strenuous  physical labor and mental exercising, that this project has come very close to an end. To start off with, the following two photos below, showing somewhat of a before and after photo set of the most difficult part of this construction. One of the photos was used in a previous post in this series and the other is a newly introduced one. Here are the before and after pictures. (I hope you can see the way it was built and what challenges were involved in doing so from these photos.)

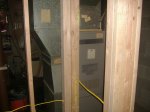
Now hidden behind the door shown in the right photo is the furnace as seen in the photo on the left.  The furnace was a monster of  a problem for one who writes music in a nearby space. Hidden above from the center and to the left is the vent work suspended below the plane of the ceiling and hidden behind the new wall on the right is one of the concrete block walls that I needed to hide. These photos are very good in demonstrating what doing this project  was all about. It has made an enormous difference in the appearance of the room and it has made the room considerably more quiet. As a side note, I have been thinking about adding some sound absorbing material behind the new door and on the side of the walls facing the furnace to make it even more quiet. The 16″ insulation added between the upstairs floor joists and the new ceiling have quieted it down a lot as well and yes, so did surrounding the vent work with insulation and 5/8″ thick wood panels.

I put in an electrical socket on the furnace side of the wall just to the right of the door you see in the second photo so any work needed to be done on the furnace could be well lit using a light also mounted there. Also, I left a large enough space between the wall and the furnace to allow a comfortable and sizable space for doing any work on the furnace and for replacing the furnace filter as needed.

The vent for heating the room can be opened and closed as needed. Adding all of the insulation has made this room more physically comfortable without the need for heat, so far. Of course winter is coming and this will be the real test as far as how much and how often I will need to open the vent to keep the room at a comfortable temperature. Both heating and cooling is provided to the room through this same vent, central air conditioning.

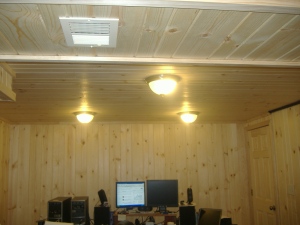
The total finished room size came out at 12′ 3″ at it’s widest point by 19′ 2″ at it’s longest point, a total of approximately 232 square feet. This photo below shows a long view of the room without much decoration and with a long (6′) table going left to right and another 6′ table coming at you with the computer set-up on it. This was my old set-up. Also, I wanted to show the ceiling a bit more than the floor so the elevation is a bit higher than one taken for a photo of a room.

The three new lights provide ample lighting for this room. These lights are on the far side of the lower hanging vent previously discussed. Here shown in the uppermost portion of the photo. Also, I want to point out the left of the photo because this shows the more complex set of planes that were discussed in the previous post but from a different angle. I have shown an additional photo below showing this in more detail and from a different angle as well.

On the right side of the photo, the furnace gas line is shown, the black line on the right, where the wall and ceiling meet. I chose to leave it exposed because I wanted to hang a drapery from it so when I record my guitar playing it will show really well and the “hanger rod” is already there.

What is clearly seen in this photo is the beauty of the knotty pine siding where I alternated the grooved side of the panel with the flat or non-groove side. It reminds me of being up high in the Sierra mountains when I  visited on many occasions while living in Southern California. I thoroughly enjoyed those visits, miss them, and so this new “space” for me is a pleasant reminder of a wonderful mountaineering experience and a present view instigating that memory.

The door on the left rear is the second door to the room leading to my workshop. Sounds impressive but it’s not:)

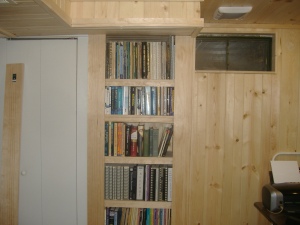
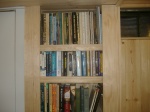
Here is a longer view of the built-in bookshelf and an additional view of the multiple planes that were difficult to tie together. The white doors to the left of the bookshelf are for other built-in cabinets that I  had made several years before. The doors and trim will be changed soon and replaced with knotty pine doors to match the remainder of the room. Total cabinet and bookshelf storage inside the room is just over 14 linear feet floor to ceiling so I now have enough space to store and/or put away anything that I am not using.

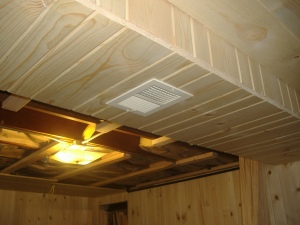
The white vent shown above and to the right of the built-in bookcase is an air vent leading to the outside of my home. It is just above the only window in the room where I can open it to get fresh air into the room easily. I wanted to have a way to clear the air so to speak and this vent was added enabling that. I had to drill a 4″ diameter hole in the 2 x 12 running left to right. It is the main floor joist for the house. To do that, I needed a special hole saw that was extremely expensive. It seemed like such a waist as all I needed was one hole drilled with it. The difficulty was not only drilling the large diameter hole but aligning the vent work between the hole and the fan housing. The housing was mounted on the overhead floor joist. The hole was drilled before placing the vent housing and so there was an offset that needed to be adjusted for making the specific project more difficult. There was not a whole lot of space to work in either, cramped and in close quarters.

Well, here we are close to the end of this series of posts. The years of thinking about making this possible and then finally getting around to doing it makes me wonder why I took so long to get off my backside and get to it. None-the-less, finally, it is finished, again with the exception of a few much smaller things to tweak the room.

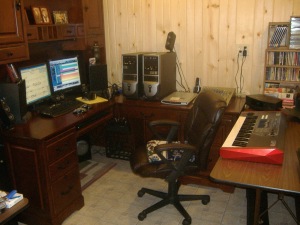
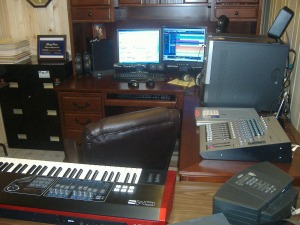
For concluding this post I wanted to show you what the finished project looks like with my furniture and equipment in place. So, the following two photos show what my DAW looks like once in place and setup ready for use. To say the least, I am thrilled with this new space, my new studio and I still cannot believe that I did it almost completely on my own.

The photos above show a view from the left and one from behind my music DAW after being setup in the room.  When sitting in my chair I am facing North. My new desk is shown here and this was a difficult decision. I thought of going with a standard DAW setup but after long and careful thinking about my actual needs I chose this one for various reasons. With this setup I am almost surrounded with the equipment I use to write and compose music all within an easy arms length reach. Just to the right of the keyboard in the second photo is my setup for playing and recording for the guitar. All in all  this is a compact setup, highly useful and comprehensive for what I do and how it is I do it.

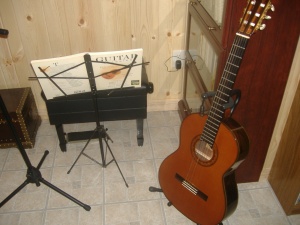
This next photo shows the space where I can record/play/practice guitar and as pointed out it is in an easy and comfortable reach to the main DAW setup . It is so close that I can record sitting in this additional area with not any difficulty for adjusting any of the recording equipment as it is needed.

Here in this area, I added an additional bookcase to hold all of my guitar music. The piano bench works well for me as it forces me to sit properly when playing and it works to stay in close proximity to the microphone stand and the DAW which is placed towards you as you look at the picture and to the immediate left. The footstool is the smaller rectangle under the piano bench. I am planning on purchasing a cherry/wooden music stand to make this a very elegant location in the room for playing and recording guitar. I am sure I will be moving things around a bit as I get back into my music writing and back to my guitar practicing/playing.

All in all I think it is well worth the costs and the effort to do this project. For those curious to know how much this project costs – with the exception of $650 for the professional electrical work, $179 dollars for tools needed to do the work and $36 for a bottle of Crown, I spent just over $1,700 ($7.33 per square foot) for the entire project. When you think about it, adding 232 square foot of living space to a home and the added value it gives, it is rather cheap, don’t you think? I had gotten two quotes from General Contractors at over $6,000 so by doing it myself I saved a huge amount of money for this project. I also secured a quote from a friend of mine, he is in construction, for adding just walls to this room. His quote was $3,000. Another quote was for $2,400 to add a drop ceiling from another.

I truly hope that this blog effort entices and urges you on to make your own “space” suitable for your interests and for the necessary equipment you use. One thing I can say for certain is – you never know what you can do until you try! Good luck in your own project.

Building a New Home Studio – Challenges

•November 29, 2009 • Leave a Comment

As one can imagine, especially someone who with very limited construction experience, you will discover many challenges in the process of building a home studio such as the one I have built in the unfinished part of my basement. In this post, I want to point out some of those challenges for others to gain some advantage over what I had when I started this project.

Heating ducts, pipes for home heating gas, electrical conduit, windows and the like, are all part of the many challenges you face when using wood as your primary construction material. It doesn’t bend too easily or go around corners. If you do not make a correct cut, you end up having to use another board as costly as they are.

This first photo shows the heating duct work that posed an enormous problem for me where I spent many hours just thinking about how I was going to cover it up using the wood products I chose.

The furnace in my home had this large heating duct that ran suspended from the ceiling plane directly across the room. I had to cut a large quantity of boards to cover this duct. That was actually the easy part. What was difficult was making certain that each board was cut perfectly and in such a way that the left side, the right side and the bottom were joined consistently  to form a “box” surrounding the duct.

These two photos show what I mean.

The panel boards were mounted to a frame made of 2 x 2’s. rather than 2 x 4’s because the weight was not that much to consider using the 2×4’s for this part of the project.

Each piece was cut by hand using a standard hand saw. In fact, I only used a hand saw and not a powered say for this entire project. Old school I guess:) In any case, it turned out pretty good. The trim boards are not shown in these photos. I’ll save that for later.

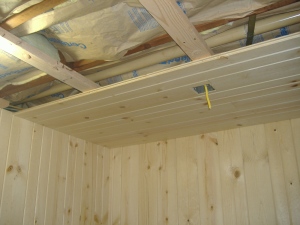
This next photo shows to problems I faced; first, the electrical cutouts on a 5/8″ thick panel board and the insulation.

The Romex wire hanging from the ceiling runs through a metal box held in place by a clamp inside the box. The panel board needed to have an  opening cut into it so a person has access to the wiring and, of coarse, so the lighting could be put up safely and securely. The problem was; I had no major set or collection of tools to do this work. Consequently, after measuring and marking the panel board, I used a drill to drill a series of holes inside the measured marks. After that, I used a Stanley knife to trim the opening as best I could. All of this took about 20 minutes to complete as 5/8″ thick wood is difficult to cut holes through where the finished opening was fairly clean cut and looking as good as possible. The finished opening is shown here and think of this, I had to do this same procedure for all of the outlets, switches and lights.

The second problem I couldn’t quite figure out was how to straighten out the insulation when it was interwoven between the floor joists, pipe, conduit and the 2 x 4’s used to drop the ceiling under all of these things. What eventually was learned was that I simply put the insulation up and continued to work at straightening it until I was satisfied. Mind you, the insulation was  4′ long and 16″ thick so this was not an easy thing to do. Maybe you are more knowledgeable then me but I have no construction experience at all making this project a major stretch of my skill as a carpenter, not very good, and my ability to think and devise a method of doing things on the fly. I did find that using a commercial grade small staple gun made it a lot easier.

Another “issue” I faced was multiple planes whereas different surfaces joined in different places and matching them up so they looked nice was for me difficult but somehow I managed to make it work out OK.

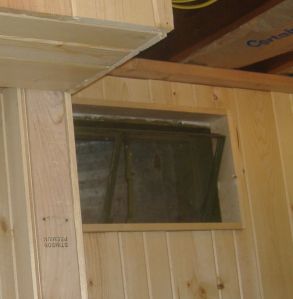
There just happened to be a window in this room:) It turned out to be right next to another “boxed in” area where the built-in bookshelf was going to go. As you can see here in this photo the panel boards needed to be cut around the window. A small challenge in and of itself. However, right next to it I had to cover another vent by creating a box around it, join it to the panel boards for the wall, join it to the ceiling boards, join it to the framing and outer panel boards and trim for the book case. Hmmm…, now how does one do that? The only way I could figure it out was to sit and stare at it for about 25 hours or so:)

Actually, I was able to figure it out by doing one thing at a time. First, I completed all of the framing for each part of the construction. Second, I finished the wall and the window including the trim.  Then I made the framing for boxing in the vent followed by putting the panel boards in place. Then I finished the panel board work for the book shelf followed by the final trim boards. All in all, by taking each part of the problem and breaking it down to smaller pieces, I was able to finish the entire work in no time:)

As I continued my journey into the construction world, I found out through hindsight that there were many things I could have doe easier than I actually did while building it. Sort of like composing your first piece of music. It is not necessarily your best piece and in fact, you most likely would redo most of it after several songs were written. I didn’t have that luxury or the experience. What I did learn was that by taking some time to think things through I was able to make good progress and the finished project looks fantastic!

In an upcoming post, the final one for this project, I will provide some additional photos showing the completed room and with furniture and decorations done as well. Until then, I hope you are finding some value in these posts for building a new home studio. Your project will be different of course but still, maybe my effort will provide to you some insights and some ideas for your own in-home studio.

Building a New Home Studio – Wood

•November 11, 2009 • Leave a Comment

I’ve been rather busy the past couple of weeks finishing the construction work in my new studio. I hope the first two installments about this project were helpful or at least a reminder and possibly a motivator to get you to try this yourself. It will truly save you a large amount of money if you do.

This post is about the wood I selected to use in the studio. I am again using photos cropped to demonstrate the different wood pieces used in the project.

First, the framing installation was all done using the standard 2 x 4’s most are familiar with. My choice was to work with 8′ long pieces as very little was needed to built using another standard of 12′ boards. The photo blow shows a small portion of the room that has already been built.

2 x 4 Construction

I chose this photo to demonstrate a single board use as well as a double and a triple, actually four pieces. The multiple pieces were nailed together using 12D nails 3.5″ long. Most of the room was framed using this pine wood material.

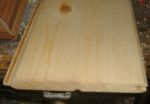
For the main wall material I used a knotty pine, tongue and groove material. It is 3/4″ thick and 7-3/16″ wide. Again, I used the 8′ material however, 12′ is available. These two photos show two styles; grooved and flat, used throughout the room.

Flat Surface Panel - Crop Grooved Surface Panel - Crop

To get a better view of the tongue and the groove sides of each panel please take a look at the next two photos. For those who may not know, the first one is of the groove side of the panel and the second one is the tongue side of the panel.

Close Up of Tongue in PanelClose Up of Tongue - CropThe next photos show them together. I offset them just a bit to see this better. The are placed groove, flat, groved, flat throughout the room to give a very good overall appearance to the final assembly.


T & G Together - Crop

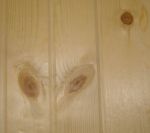
Taking a slightly different perspective, I put a couple of panels together to provide the look of the knotty pine as it would appear on a wall once installed. Oh, I used 4D Finishing nails on an angle, on the tongue side of the panel, to secure them as each was set up and placed appropriately.

Close up of Basic Wood Type - Crop

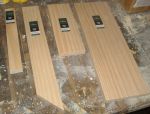
Beyond the generic 2 x 4’s and the main paneling I used several different sizes of wood trim, again, pine wood, to finish the edges and corners where two panels met from different directions. The photo below shows the following sizes of trim; 1″ x 2″, 1″ x 3″, 1″ x 4″ and 1″ x 6″. The largest size I used was a 1′ x 12″ and it was used only as the base of each shelf in the built-in bookcase. This is not shown in the photo below but I think you get the idea.

Wood Trim Samples - Crop

Here is a photo of how the trim pieces were used. It shows the left side of the built-in bookcase. The 6″ board is the vertical one on the left. The top 1″ board is actually one of the 12″ wide trim panels for the shelf base and the lower 1″ board is the 1″ x 2″ trim used to give it a somewhat decorative look. The were offset by 1/8″.

Use of Trim - Bookshelf - Crop

Here are two more showing a broader view of the use of the trim boards.

Remodel - Phase Four 009

Remodel - Phase Four 008

The doors were the most difficult for me to choose. I never new there were so many different style to select from. The next photo shows the 6-Panel Pine Doors used in the studio.

6-Panel Door - Crop

In subsequent posts, I plan on showing the tools I used to build the studio, the insulation used in more detail, the fasteners used and an overall room view so you can see the finished studio.

I hope this series of posts is in some way helpful or motivational to you. It is somewhat of my main topics for this blog however, it is definitely part of the environment in which I will be working at composing a lot more music in the coming weeks, months and years to come.

More soon.

Building a New Home Studio! – Part 2 Electrical

•October 28, 2009 • Leave a Comment

It was all Jeff’s fault:)

A co-worker of mine, Jeff, came by to visit me from New York to stay over the weekend. We had so much fun when I went out to visit him at his home and he reciprocated by stopping by and putting me to work, motivating me to get started on my music studio.  So, for that Jeff, thanks a million!

It was one of those projects where it would cost a lot of money, if hired out professionally, and it just never seemed to happen.  I had visions of a nice room or studio where I could write my music and enjoy the setting at the same time. Additionally, after spending nearly 10 years writing music out of a cold dark corner in my basement it seemed about time to put something together more suited to my taste and a lot more comfortable.

Jeff came by on a Friday night and we had a wonderful initial visit. He managed to get me to talk about what I wanted to do in my “old” studio. I had explained first that I needed to have some more electrical outlets for my equipment and that started the ball rolling. The general effort regarding the electrical will be written about in this post. I’ll cover other topics in subsequent posts.

This first photo is an example of the work we did over the next couple of days, mostly on Saturday though.We managed to install 10 new electrical outlets expanding my world a lot.

It's all Jeff's fault!

It's all Jeff's fault!

The background is of the cement wall painted over with a sealant to prevent moisture and any possibility of mildew. There is actually three layers of paint because sometimes I do over kill to make certain:) The flooring was laid out casually for the photo, otherwise the floor is normally a dark brown painted cement floor with a tan color showing through from flaking off. One of my earlier attempts to decorate my dungeon:)

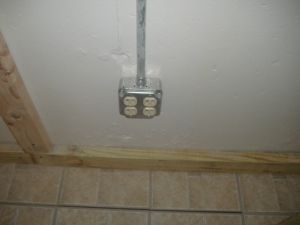
Our “work” that weekend involved putting in some more outlets as shown in this photo. There are four now where there was none before. We put in these four, four in another location (a different wall) nearby and an additional two on this same wall. The 2 x 4’s showing in the picture were the beginnings of the new interior framing that was going in.

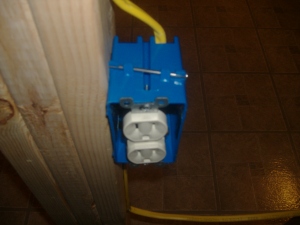
Socket CoversLater in this project I changed the electrical box covers to be the unbreakable ivory colored, nylon covers you are probably more familiar with. Also, as the project progressed and the building codes were understood more I changed to using the outlet boxes shown in the following photo. They were easier to work with but I think the metal ones are better over time. Personal choice I think, paper or plastic, but I did change to the blue plastic ones.

!cid_DWT172

They come with a long mounting nail on the top as seen and on the bottom. You just simply locate where you want to place it and nail it down. One thing to remember is that you need to know how thick your outer wall covering is to determine the best depth location of the box, otherwise, you will have to pull them and relocate them later once the thickness is known.

In case you do not know, the yellow wire is called Romex and it is basically a black wire, a white wire and a bare copper wire wrapped in a plastic sheath. For those that do not know, the black wire is the powered or live wire, the white is the neutral wire and the bare wire is your ground wire.

Finding it necessary to study electrical work for home use I became comfortable with the idea of working with electrical circuits and electricity in general, thanks to the circuit breaker box in my garage. Fortunately, I learned the easy way as the hard way didn’t sound like too much fun:)

!cid_DWT174

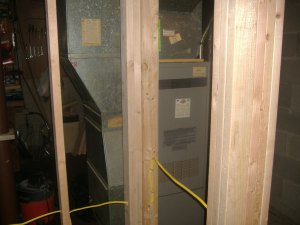
I was doing pretty good until I discovered that turning a corner was a newly discovered problem. How do you keep the wire inside the inner portion of the 2 x 4’s and turn the corner? Now I am not a very good carpenter but I had to figure out how to drill two holes that intersected through two 2 x 4’s on one side and three 2 x 4’s on the other where only one wire goes through all of the holes in both sections (note the right collection of joined 2 x 4’s).  Plus, I had to drop the height of the wire several inches for the second wall to properly place the outlet on the second wall. Geometry and me didn’t get along so well but somehow I managed to pull it off. The above photo shows my handy work and my level of understanding about interior wall construction, limited as it is.

Staples

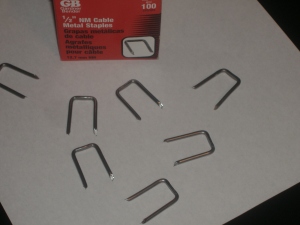
Oh yeah, to hold the wire onto the 2 x 4’s  I used 1/2″ NM Cable Metal Staples. They came in a box of 100 and I didn’t think I would use them all too often but certainly what did I know? I put in a total of about 250 feet of Romex wiring into this project. I’ve got about two dozen of the staples left over.  I managed to destroy about 6 during the hammering process.

All together I put in five additional sockets, one double light switch box, four single light switches four overhead lights and one exhaust (ceiling) fan exiting stale air to the outside of my home. Not bad for a rookie. Yeah right!?! Remember my friend Jeff? He put in ten outlets so I think I have enough now:)

The total truth is that after Jef and I did all of that I hired an electrical contractor to come in to hook it all up and to make any changes necessary to meet the building codes for my City. He spent three hours redoing most of my work and he even told me a couple of good jokes:) He did say that I saved about 2 hours of his labor rate by  doing all of the “prep” and so I took that money and purchased more wood. Spending the money for the professional electrical services was pretty cheap insurance and for a novice like me, it enabled me to sleep soundly at night without concerns of an electrical fire or something nasty like that. I’ll be taking more photos of the overhead light fixtures and the two switch plates and post them in another post on this subject.

As my old Grandpappy use to say, “you don’t know what’s in the pickle barrel until you take the lid off’n it!”

Building a New Home Music Studio!

•October 3, 2009 • Leave a Comment

After four long years of saving money, I finally got enough together to build me a new home studio. It is planned to be 200 square feet of custom music space! I’m about half way done at this point in time! So far, the flooring is done, two new walls, all new electrical for inside the walls, all heating and air conditioning duct work,  and all framing, with the exception of one 12 foot concrete wall that will be completed tomorrow, all of this is done now.

Over the next couple of weeks I should be able to get this project totally completed enabling me to get back to work writing more music in a new studio workspace specifically designed for music creation! I plan on making several posts about my adventure into construction complete with some photos of the different things needed to be done to make a home studio.

This is not a world class $1, 000,000 studio rather it is a studio on a budget, a small budget where I supply all of the labor and where most of the supplies are purchased through Home Depot. All computers, musical instruments, software, hardware and additional equipments is already purchased and not part of the budget for the room.

This post is more or less an introduction to the project with no photos at this time. I’ll post again real soon with some photos of  work in process and maybe if I can figure out how to post videos I will do that too. After it is done I will take more photos showing the completed room with any furniture and then with the furniture and all other decorations making it a working studio. I will post them here as well.

Stay Tuned:-)

My CD’s – Direct Purchase Links Added!

•September 15, 2009 • Leave a Comment

Hey everyone! I finally discovered how to add the shopping cart so you can purchase CD’s direct from me on this site!

I didn’t think this could be done but have since discovered it not only could be but, that I could do it! Rather amazing for an old geezer with limited IT skills.

After you put in your State, Zip Code and Country, click on the Calculate Shipping Button and you are then transported into the Secure Zone! where you can safely complete your transaction.

Please feel free to stop by to purchase your very own copy of any one or all of my CD’s by clicking here – My CD’s!

Also, I’m still working on my new website and on developing the concepts of the more expansive approach for a much broader and still music related website. For now I am calling it The StringTunes Organization! I’ll be making more announcements about this idea in the near future.  So, please stop in or  watch for the posts about this.

Thanks in advance for buying my CD’s it helps to cover the costs of running these websites.

Thanks again!

Don

Trail Of Tears

•September 11, 2009 • Leave a Comment

I found this really cool place to post my music in additional to the countless other places out there. Take a look!

Don Rath Jr. – Trail Of Tears

Red Violin Blog

•August 6, 2009 • 1 Comment

Hey everyone! I wanted to do a quick post to let you know of a pretty cool blog called the red violin. This blog is in the native tongue of Portuguese so, if you do not read or understand this language, please view it with a language translation program. You can also copy the link to Google and press Translate this page too. It is worth the effort to do this if you are seeking different approaches for learning to play the violin. Here’s the link – The Red Violin Blog