Building a New Home Studio – Wood
I’ve been rather busy the past couple of weeks finishing the construction work in my new studio. I hope the first two installments about this project were helpful or at least a reminder and possibly a motivator to get you to try this yourself. It will truly save you a large amount of money if you do.
This post is about the wood I selected to use in the studio. I am again using photos cropped to demonstrate the different wood pieces used in the project.
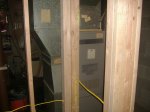
First, the framing installation was all done using the standard 2 x 4’s most are familiar with. My choice was to work with 8′ long pieces as very little was needed to built using another standard of 12′ boards. The photo blow shows a small portion of the room that has already been built.
I chose this photo to demonstrate a single board use as well as a double and a triple, actually four pieces. The multiple pieces were nailed together using 12D nails 3.5″ long. Most of the room was framed using this pine wood material.
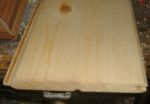
For the main wall material I used a knotty pine, tongue and groove material. It is 3/4″ thick and 7-3/16″ wide. Again, I used the 8′ material however, 12′ is available. These two photos show two styles; grooved and flat, used throughout the room.
To get a better view of the tongue and the groove sides of each panel please take a look at the next two photos. For those who may not know, the first one is of the groove side of the panel and the second one is the tongue side of the panel.
![]()
 The next photos show them together. I offset them just a bit to see this better. The are placed groove, flat, groved, flat throughout the room to give a very good overall appearance to the final assembly.
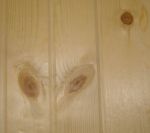
Taking a slightly different perspective, I put a couple of panels together to provide the look of the knotty pine as it would appear on a wall once installed. Oh, I used 4D Finishing nails on an angle, on the tongue side of the panel, to secure them as each was set up and placed appropriately.
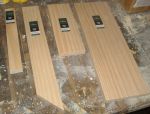
Beyond the generic 2 x 4’s and the main paneling I used several different sizes of wood trim, again, pine wood, to finish the edges and corners where two panels met from different directions. The photo below shows the following sizes of trim; 1″ x 2″, 1″ x 3″, 1″ x 4″ and 1″ x 6″. The largest size I used was a 1′ x 12″ and it was used only as the base of each shelf in the built-in bookcase. This is not shown in the photo below but I think you get the idea.
Here is a photo of how the trim pieces were used. It shows the left side of the built-in bookcase. The 6″ board is the vertical one on the left. The top 1″ board is actually one of the 12″ wide trim panels for the shelf base and the lower 1″ board is the 1″ x 2″ trim used to give it a somewhat decorative look. The were offset by 1/8″.
Here are two more showing a broader view of the use of the trim boards.
The doors were the most difficult for me to choose. I never new there were so many different style to select from. The next photo shows the 6-Panel Pine Doors used in the studio.
In subsequent posts, I plan on showing the tools I used to build the studio, the insulation used in more detail, the fasteners used and an overall room view so you can see the finished studio.
I hope this series of posts is in some way helpful or motivational to you. It is somewhat of my main topics for this blog however, it is definitely part of the environment in which I will be working at composing a lot more music in the coming weeks, months and years to come.
More soon.

